UICollectionViewCell をタップしたときにセルの色を変える
UICollectionView のセルをタップしたときに何のリアクションもないと寂しいので、セルの色を変える方法を調べました。
UICollectionViewDelegate を継承した Class に以下のメソッドを追加することで、セルをタップしている間は色を変え、離したら元の色に戻るという挙動になります。
    func collectionView(collectionView: UICollectionView, didHighlightItemAtIndexPath indexPath: NSIndexPath) {
        let cell = collectionView.cellForItemAtIndexPath(indexPath)!
        cell.backgroundColor = UIColor.clearColor() // タップしているときの色にする
    }

    func collectionView(collectionView: UICollectionView, didUnhighlightItemAtIndexPath indexPath: NSIndexPath) {
        let cell = collectionView.cellForItemAtIndexPath(indexPath)!
        cell.backgroundColor = UIColor.darkGrayColor()  // 元の色にする
    }
MVP と MVVM
MVP と MVVM の違いがよくわからなかったのですが、 調べているうちに違いがなんとなく分かった気がしたので、自分の理解での処理の流れ書いてみます。
MVP
2 種類ある
Passive View
- View で入力がある。
- View が入力があったことを知る。
- 受け取った入力に対する処理を Presenter へ委譲する。
- Presenter が処理を行い、 Model を操作する。
- Model の値に変更があれば、 その結果を View に渡す。
Supervising Controller
- View で入力がある。
- View が入力があったことを知る。
- 受け取った入力に対する処理を Presenter へ委譲する。
- Presenter が処理を行い、 Model を操作する。
- Model の値に変更があれば、その変更が View に反映される。
MVVC
- View で入力がある。
- View が入力があったことを知る。
- 受け取った入力に対する処理を ViewModel へ委譲する。
- ViewModel が処理を行い、 Model を操作する。
- ViewModel で Model の状態を保持しておき、変更があれば View に反映される。
違いは、 5 番目の処理の、 Model の変更をどうやって View へ知らせるかという部分だけ、というように理解しております。
Swift で早期リターン
早期リターンを使うと、コードが読みやすくなります。
例えば、 nil をとりうる値 hoge があって、 nil のときは処理を終了させたいというメソッドの場合、Ruby ではこんな感じになります。
# 早期リターンなし
def test
  if hoge
    # hoge が nil でないときの処理
  else
    return
  end
end

# 早期リターンありその 1
def test
  if hoge == nil
    return
  end

  # hoge が nil でないときの処理
end

# 早期リターンその 2
def test
  return if hoge == nil

  # hoge が nil でないときの処理
end
hoge が nil のときは、 return if hoge == nil 以降の処理が実行されないということがすぐに分かります。
Swift の場合、 こんな感じでかけるかと思います。
// 早期リターンなし
func test() -> Void {
  if hoge != nil {
    // hoge が nil でないときの処理
  } else {
    // hoge が nil のときの処理
  }
}

// 早期リターンあり
func test() -> Void {
  if hoge == nil {
    return
  }

  // hoge が nil でないときの処理
}
Swift2 からは guard というのがあり、これを使うこともできそうです。
func test() -> Void {
  guard hoge != nil {
    return
  }

  // hoge が nil でないときの処理
}
guard を使うことで、早期リターンをしているんだなということがわかりやすくなりそうです。
また、 guard ではアンラップもしてくれるようなので、 hoge の値を使いたいというときにも便利そうです。
// guard なしその 1
func test() -> Void {
  if let unwrappedHoge = hoge {
    print(unwrappedHoge)
  } else {
    return
  }
}

// guard なしその 2
func test() -> Void {
  if hoge == nil {
    return
  }

  print(hoge!)
}

// guard あり
func test() -> Void {
  guard let unwrappedHoge = hoge else {
    return
  }

  print(unwrappedHoge)
}
Rails のルーティング
ルーティングを追加するとき、毎回調べているので少しずつまとめていこうかと思います。 等価な書き方が色々あるので絶対これというわけではありません。
scope
URI Pattern にのみ追加されます。
Rails.application.routes.draw do
  scope :user do
    resources :profile
  end
end
➜  sample git:(master) ✗ be rake routes
       Prefix Verb   URI Pattern                      Controller#Action
profile_index GET    /user/profile(.:format)          profile#index
              POST   /user/profile(.:format)          profile#create
  new_profile GET    /user/profile/new(.:format)      profile#new
 edit_profile GET    /user/profile/:id/edit(.:format) profile#edit
      profile GET    /user/profile/:id(.:format)      profile#show
              PATCH  /user/profile/:id(.:format)      profile#update
              PUT    /user/profile/:id(.:format)      profile#update
              DELETE /user/profile/:id(.:format)      profile#destroy
scope module:
Controller#Action にのみ追加されます。
Rails.application.routes.draw do
  scope module: :user do
    resources :profile
  end
end
➜  sample git:(master) ✗ be rake routes
       Prefix Verb   URI Pattern                 Controller#Action
profile_index GET    /profile(.:format)          user/profile#index
              POST   /profile(.:format)          user/profile#create
  new_profile GET    /profile/new(.:format)      user/profile#new
 edit_profile GET    /profile/:id/edit(.:format) user/profile#edit
      profile GET    /profile/:id(.:format)      user/profile#show
              PATCH  /profile/:id(.:format)      user/profile#update
              PUT    /profile/:id(.:format)      user/profile#update
              DELETE /profile/:id(.:format)      user/profile#destroy
scope as:
Prefix にのみ追加されます。
Rails.application.routes.draw do
  scope as: :user do
    resources :profile
  end
end
➜  sample git:(master) ✗ be rake routes
            Prefix Verb   URI Pattern                 Controller#Action
user_profile_index GET    /profile(.:format)          profile#index
                   POST   /profile(.:format)          profile#create
  new_user_profile GET    /profile/new(.:format)      profile#new
 edit_user_profile GET    /profile/:id/edit(.:format) profile#edit
      user_profile GET    /profile/:id(.:format)      profile#show
                   PATCH  /profile/:id(.:format)      profile#update
                   PUT    /profile/:id(.:format)      profile#update
                   DELETE /profile/:id(.:format)      profile#destroy
scope と module: と as:
Prefix と URI Pattern と Controller#Action 全てに追加されます。
Rails.application.routes.draw do
  scope :user, module: :user, as: :user do
    resources :profile
  end
end
➜  sample git:(master) ✗ be rake routes
            Prefix Verb   URI Pattern                      Controller#Action
user_profile_index GET    /user/profile(.:format)          user/profile#index
                   POST   /user/profile(.:format)          user/profile#create
  new_user_profile GET    /user/profile/new(.:format)      user/profile#new
 edit_user_profile GET    /user/profile/:id/edit(.:format) user/profile#edit
      user_profile GET    /user/profile/:id(.:format)      user/profile#show
                   PATCH  /user/profile/:id(.:format)      user/profile#update
                   PUT    /user/profile/:id(.:format)      user/profile#update
                   DELETE /user/profile/:id(.:format)      user/profile#destroy
namespace
Prefix と URI Pattern と Controller#Action 全てに追加されます。
( scope と module: と as: ) と同じ結果になります。
Rails.application.routes.draw do
  namespace :user do
    resources :profile
  end
end
➜  sample git:(master) ✗ be rake routes
            Prefix Verb   URI Pattern                      Controller#Action
user_profile_index GET    /user/profile(.:format)          user/profile#index
                   POST   /user/profile(.:format)          user/profile#create
  new_user_profile GET    /user/profile/new(.:format)      user/profile#new
 edit_user_profile GET    /user/profile/:id/edit(.:format) user/profile#edit
      user_profile GET    /user/profile/:id(.:format)      user/profile#show
                   PATCH  /user/profile/:id(.:format)      user/profile#update
                   PUT    /user/profile/:id(.:format)      user/profile#update
                   DELETE /user/profile/:id(.:format)      user/profile#destroy
Git で 変更を一時的によける
あるブランチで色々変更をしていて、中途半端だけど、急遽他のブランチで作業をしなければならなくなった時に、 git stash というコマンドが便利です。
変更を加える
➜  sample git:(hoge) touch hoge.txt
➜  sample git:(hoge) ✗ git add .
➜  sample git:(hoge) ✗ git commit -m "hoge.txt の作成"
➜  sample git:(hoge) hoge.txt の編集
➜  sample git:(hoge) ✗ git status
On branch hoge
Changes not staged for commit:
  (use "git add <file>..." to update what will be committed)
  (use "git checkout -- <file>..." to discard changes in working directory)

        modified:   hoge.txt

no changes added to commit (use "git add" and/or "git commit -a")
hoge.txt が作成されている hoge ブランチで hoge.txt を編集します。
git status でワークツリーに変更が加わっていることが確認できています。
変更をよける
ここで git stash を実行して、変更を一時的によけてみます。
➜  sample git:(hoge) ✗ git stash
Saved working directory and index state WIP on hoge: 2e894e0 hoge.txt の作成
HEAD is now at 2e894e0 hoge.txt の作成
➜  sample git:(hoge) git status
On branch hoge
nothing to commit, working directory clean
すると、git status を実行しても先ほどの hoge.txt の変更は表示されません。
一時的によけた変更は、 git stash show で確認できます。
➜  sample git:(hoge) git stash show

 hoge.txt | 1 +
 1 file changed, 1 insertion(+)
他のブランチで変更を加える
そして、fuga ブランチへ checkout して fuga.txt を作成し、これをコミットします。
➜  sample git:(hoge) git checkout fuga
Switched to branch 'fuga'
➜  sample git:(fuga) touch fuga.txt
➜  sample git:(fuga) ✗ git add .
➜  sample git:(fuga) ✗ git commit -m "fuga.txt の作成"
[fuga 199f6b5] fuga.txt の作成
 1 file changed, 0 insertions(+), 0 deletions(-)
 create mode 100644 fuga.txt
git show でコミット内容を確認してみても、hoge ブランチで行った作業の内容はコミットされていないことが確認できます。
➜  sample git:(fuga) git show

commit 199f6b526fc2b6612e31b8e913df2fe2ae4f0d42
Author: fuga <fuga@fuga.fuga>
Date:   Mon May 23 23:11:46 2016 +0900

    fuga.txt の作成

diff --git a/fuga.txt b/fuga.txt
new file mode 100644
index 0000000..e69de29
変更を戻す
次に、再び hoge ブランチへ checkout します。
先ほど一時的によけた変更を元に戻すには git stash pop を実行します。
➜  sample git:(fuga) git checkout hoge
Switched to branch 'hoge'
➜  sample git:(hoge) git stash pop
On branch hoge
Changes not staged for commit:
  (use "git add <file>..." to update what will be committed)
  (use "git checkout -- <file>..." to discard changes in working directory)

        modified:   hoge.txt

no changes added to commit (use "git add" and/or "git commit -a")
Dropped refs/stash@{0} (8e370d4ff891b72ee304fca8bca60b7371663fff)
念のため git status を実行してみると、変更が元に戻っていることが確認できます。
➜  sample git:(hoge) ✗ git status
On branch hoge
Changes not staged for commit:
  (use "git add <file>..." to update what will be committed)
  (use "git checkout -- <file>..." to discard changes in working directory)

        modified:   hoge.txt

no changes added to commit (use "git add" and/or "git commit -a")
TableViewController と Storyboard でテーブルをつくる (Swift)
ViewController でテーブルを作成する記事はよく見かけたのですが、 TableViewController を使う方法はあまりなかったのでメモ。
まだまだ学び始めたばかりでよくわかっていないことだらけなので、手順だけ。
ざっくり書くと、
- storyboard で TableViewController を追加
- 追加した TableViewController の cell に要素を追加
- TableViewController に対応させるファイル ( TableViewController.swift ) を作成
- cell に対応させるファイル ( TableViewCell.swift ) を作成
- cell と TableViewCell.swift を対応させる
- TableViewController と TableViewController.swift を対応させる
- TableViewController.swift を実装する
という流れです。
storyboard で TableViewController を追加
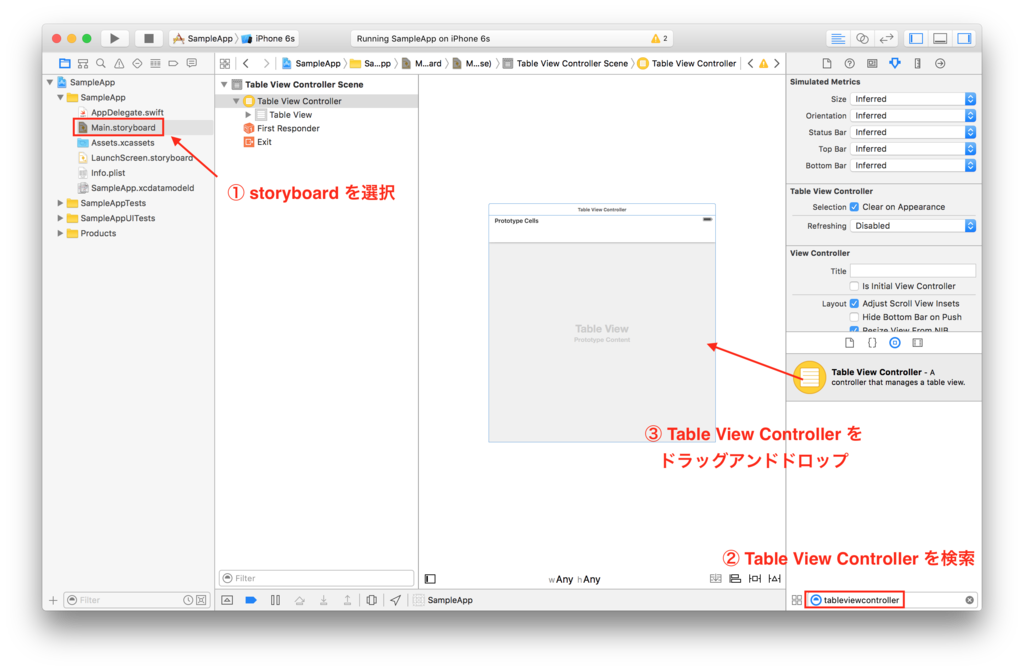
storyboard を選択し、右下のライブラリの検索窓に tableviewcontroller 等と入力して、 TableViewController をドラッグアンドドロップ。
追加した TableViewController の cell に要素を追加
先ほどと同様に、cell に追加したい要素をライブラリで検索します。
要素を cell の上にドラッグアンドドロップで配置します。

TableViewController に対応するファイル ( TableViewController.swift ) を作成
command + N 等でファイル作成画面を開きます。
Cocoa Touch Class を選択します。

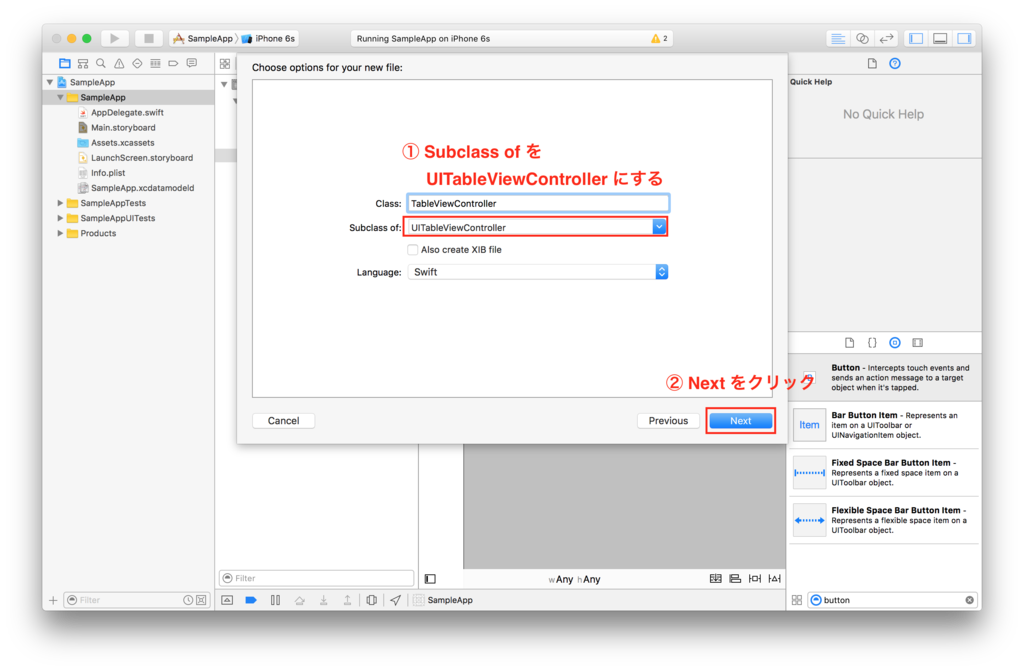
次画面で、 Subclass of を UITableViewController にします。
Class 名は自由に変更して構いません。
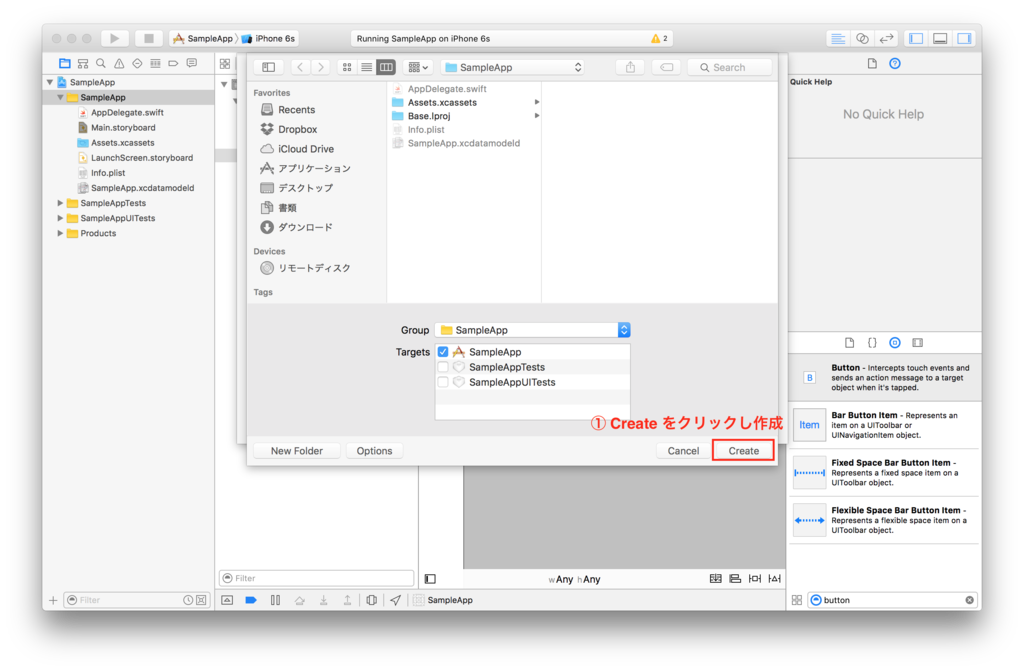
そのままファイルを作成します。
cell に対応させるファイル ( TableViewCell.swift ) を作成
先ほどと同様に、 Cocoa Touch Class を選択します。
次画面で、 Subclass of を UITableViewCell にします。
Class 名は自由に変更して構いません。
そのままファイルを作成します。

cell と TableViewCell.swift を対応させる
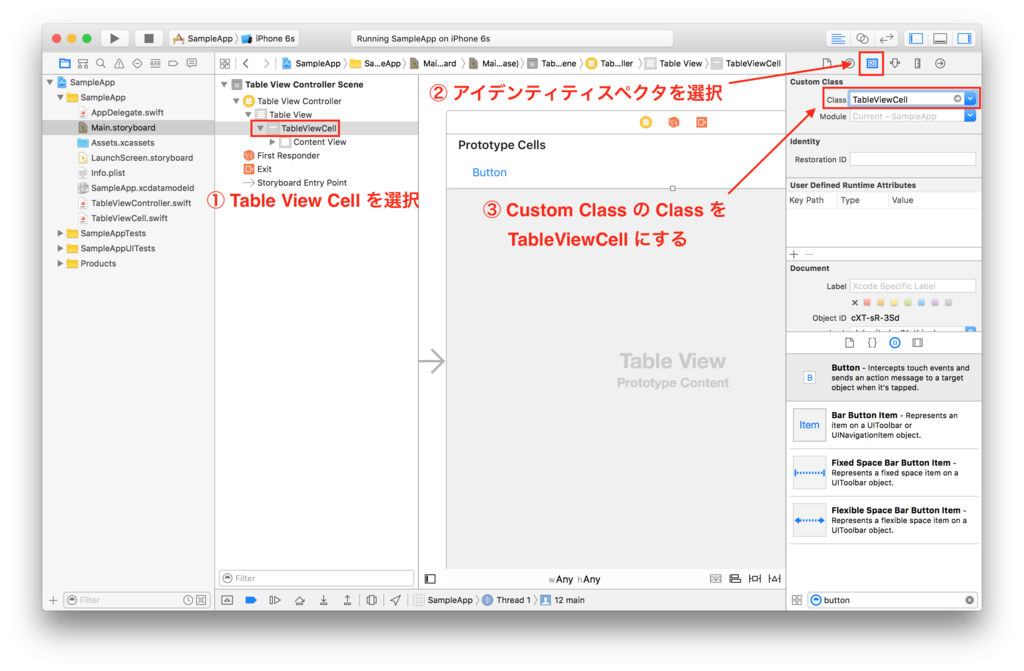
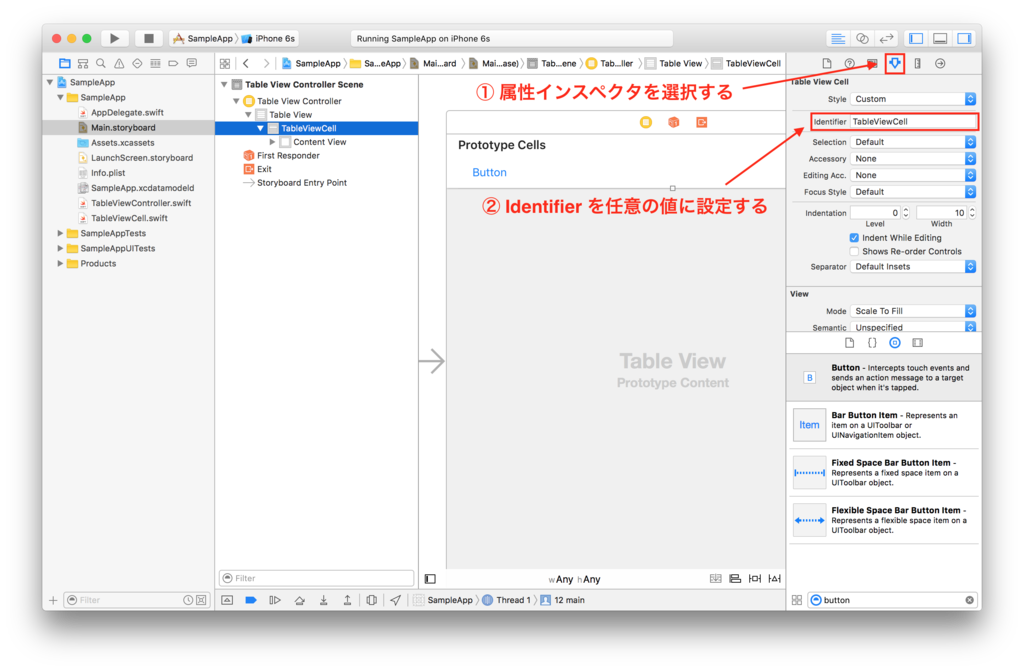
アイデンティティインスペクタから Custom Class の Class を TableViewCell にします。
次に、属性インスペクタ から Identifier を任意の値に設定します。この値はファイル名と対応していなくて構いません。
TableViewController と TableViewController.swift を対応させる
先ほどと同様に、 アイデンティティインスペクタから Custom Class の Class を TableViewController にします。

ちなみに、ここまでの作業だけで storyboard で cell に追加した要素が表示されるようになるかと思うかもしれませんが、まだ不十分です。
Build には成功しますが、以下のよう cell には何も表示されないので、後述の実装が必須となります。

UITableViewController.swift を実装する
たくさんコードが書いてありますが、変更する箇所は以下の関数 3 つです。
override func numberOfSectionsInTableView(tableView: UITableView) -> Int {
    // #warning Incomplete implementation, return the number of sections
    return 0
}

override func tableView(tableView: UITableView, numberOfRowsInSection section: Int) -> Int {
    // #warning Incomplete implementation, return the number of rows
    return 0
}

/*
override func tableView(tableView: UITableView, cellForRowAtIndexPath indexPath: NSIndexPath) -> UITableViewCell {
    let cell = tableView.dequeueReusableCellWithIdentifier("reuseIdentifier", forIndexPath: indexPath)

    // Configure the cell...

    return cell
}
/*
この 3 つを以下のように書き換えるだけです。
override func numberOfSectionsInTableView(tableView: UITableView) -> Int {
    // #warning Incomplete implementation, return the number of sections
    return 5 // 任意の値に変更する ( 1 セクションあたりの行数 )
}

override func tableView(tableView: UITableView, numberOfRowsInSection section: Int) -> Int {
    // #warning Incomplete implementation, return the number of rows
    return 1 // 任意の値に変更する ( セクション数 )
}

// コメントアウトを外す
override func tableView(tableView: UITableView, cellForRowAtIndexPath indexPath: NSIndexPath) -> UITableViewCell {
    let cell = tableView.dequeueReusableCellWithIdentifier("TableViewCell", forIndexPath: indexPath) // reuseIdentifier を cell に設定した Identifier に書き換える

    // Configure the cell...

    return cell
}
以上で作業は終わりです。
確認する
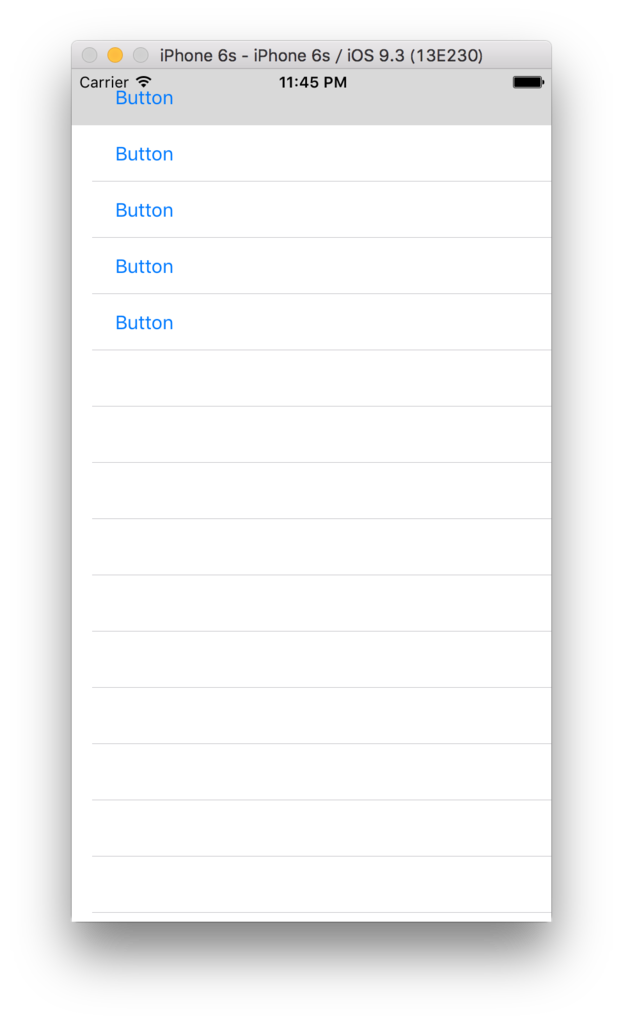
Build すると追加した要素が表示されていることを確認できます。
レイアウトは調整していないので汚いです。
モデルの属性に自作のバリデーションを追加する
モデルの属性のバリデーションをしたいときに、バリデーションヘルパーの既存バリデーションだけでは足りないことがあると思います。
そのため、Rails ではバリデーションを自作することができます。
その一つの方法としてバリデーションメソッドがあります。
バリデーションメソッド
バリデーション用のメソッドを定義して、オブジェクトの保存時にそのメソッドによりバリデーションする方法です。
例えば、 name 属性を持つ Account モデルに対して、 name の prefix として hoge_ があるというバリデーションをしたい (?) 場合には、以下のようにします。
class Account < ActiveRecord::Base
  validate :prefix_hoge # 保存時に prefix_hoge によりバリデーションをする

  # バリデーションメソッド
  def prefix_hoge
    if name !~ /^hoge\_/ # バリデーションの条件
      errors.add(:name, " は hoge_ から始まるようにしましょう!") # エラーメッセージ
    end
  end
end
これにより、 prefix として hoge_ のない name を持つ Account のオブジェクトを保存しようとするとエラーになります。
# hoge_ あり
irb(main):001:0> Account.first.update(name: 'hoge_test')
  Account Load (0.3ms)  SELECT  `accounts`.* FROM `accounts`  ORDER BY `accounts`.`id` ASC LIMIT 1
   (0.2ms)  BEGIN
  SQL (0.3ms)  UPDATE `accounts` SET `name` = 'hoge_test', `updated_at` = '2016-05-13 14:59:13' WHERE `accounts`.`id` = 1
   (0.6ms)  COMMIT
=> true

# hoge_ なし
irb(main):002:0> Account.first.update(name: 'test')
  Account Load (0.3ms)  SELECT  `accounts`.* FROM `accounts`  ORDER BY `accounts`.`id` ASC LIMIT 1
   (0.1ms)  BEGIN
   (0.2ms)  ROLLBACK
=> false
ですが、 複数の属性に対してバリデーションヘルパーとバリデーションメソッドの両方を利用すると、以下のように同一の属性のバリデーションの記述が分散してしまうことがあります。
class Account < ActiveRecord::Base
  validates  :name,
    presence: true,
    length: { maximum: 10 }

  validates :email,
    presence: true

  validate :prefix_hoge

  validate :email_validation
バリデーションを自作する他の方法として、カスタムバリデータがあります。 こちらを使えば上記の点を防ぐことができます。
カスタムバリデータ
先ほどと同様のバリデーションを追加します。
カスタムバリデータは、 バリデーションを自作するためのクラスを継承したクラスを作ります。
クラスには ActiveModel::Validator と ActiveModel::EachValidator の二種類があるのですが、後者の方が使いやすいと思うのでそちらについてのみ書きます。
クラスをパスの通っている場所に作成します。
# lib/validators/prefix_hoge_validator.rb

class PrefixHogeValidator < ActiveModel::EachValidator
  def validate_each(record, attribute, value) # バリデーションメソッド
    if value !~ /^hoge\_/
      record.errors.add(attribute, " は hoge_ から始まるようにしましょう!")
    end
  end
end
バリデーションメソッドは必ず validate_each とします。
validate_each の引数の record に保存対象のオブジェクトが、 attribute にバリデーション対象の属性が、 value に保存する値
が渡ってきます。
これを Account モデルで利用する際には、バリデーションヘルパーのように記述することができます。
class Account < ActiveRecord::Base
  validates :name,
    prefix_hoge: true
これで先ほどと同様のバリデーションをすることができます。
カスタムバリデータであれば、複数の属性に対してバリデーションヘルパーとバリデーションメソッドの両方を利用したとしても、以下のように対象の属性の記述が一箇所にまとまり見やすくなります。
class Account < ActiveRecord::Base
  validates  :name,
    presence: true,
    length: { maximum: 10 },
    prefix_hoge: true

  validates :email,
    presence: true
    email_validation: true
とはいえ、毎回カスタムバリデータを使うのではなく、それぞれのメリットデメリットを見極めて使うと良さそうです。